Hi everyone!
S. Valentine’s day is approaching (I am sure,
no one was aware of that!), so today I want to share a little, quick project, which
is easy to make and would be a nice present for your loved ones (or maybe for
yourself ;-) ).
It’s a cute stuffed heart, which you can easily
personalize in so many ways! I will give you all the options I could come up
with at the end, but first of all, here are the instructions!
Materials:
- Fabric
- Stuffing material
- Needle
- Thread
- Scissors
- Ribbons and other decorations
Preparation: cut two pieces of fabric (I used cream
felt and checkered cotton) to create two heart shapes of the same dimension.
You can chose the size, just remember to leave about 1cm of margin, which you
will use to sew them together. Also consider that, when you add stuffing, the
size will be reduced. Cut a smaller heart in a fabric that complements (or
contrasts) the one you will use for the front (I chose red felt). You can, of
course, draw your templates in the shapes and dimensions you wish, but if you
want, you can also download the ones I created here.
- Pin the small heart at the center of the one you wish to use as front (picture1)
- Using a thick thread in a contrasting color, sew by hand all around the perimeter (picture 2). The advantage of using felt for the heart on top is that it will not fray.
- If you want to be able to hang the little cushion, pin a ribbon to the fabric you will be using for the back (picture 3). It is very important to pin it correctly, otherwise you will find it in the wrong place once the piece is finished: first of all, fold the ribbon in half. Now, keeping the ends well aligned and on top, pin it to the FRONT of the fabric (the side that will be on the outside of the heart). Leave 1/1.5cm of ribbon ends, so that, once you hang the heart, the ribbon will not fray. Remember to avoid placing the pin too close to where you will be sewing, mostly if you plan on using a sewing machine).
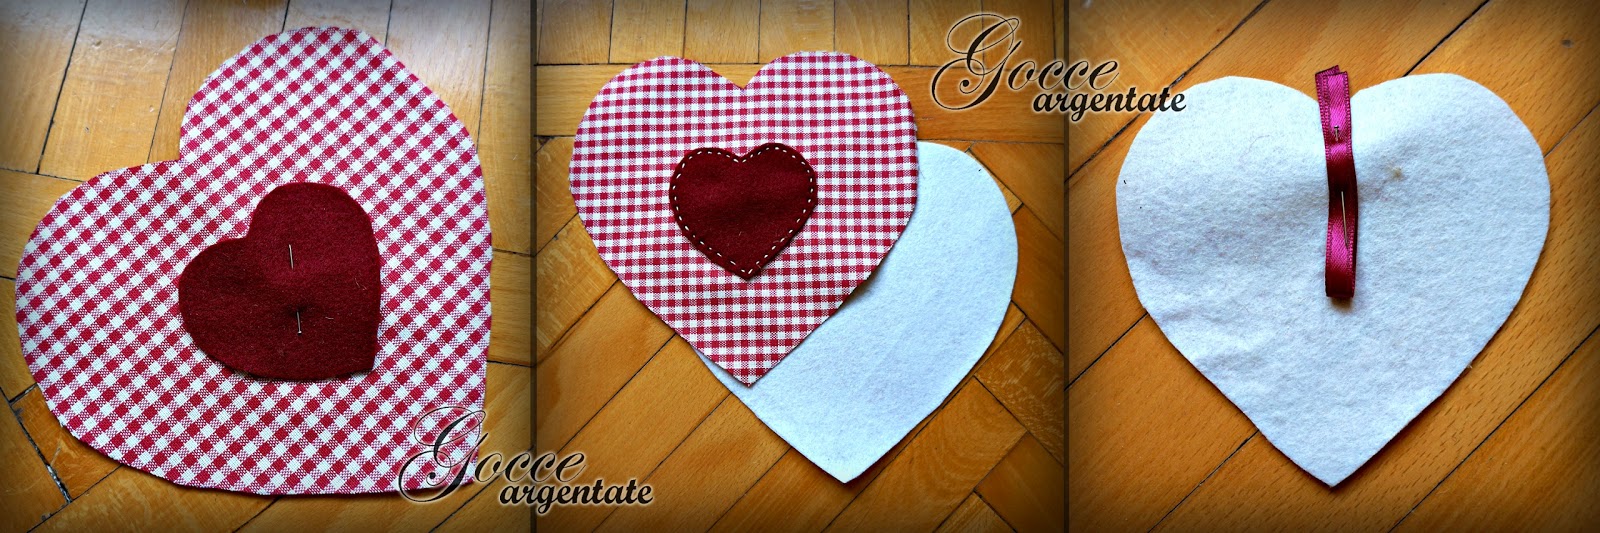
- Now, align and pin the two hearts together. It is very important to keep on the inside the surface of the fabric that will in the end be on the outside (on other words, the two sides you want to see will now face each other). If you pinned the ribbon, it should now be in between the hearts (picture 4).
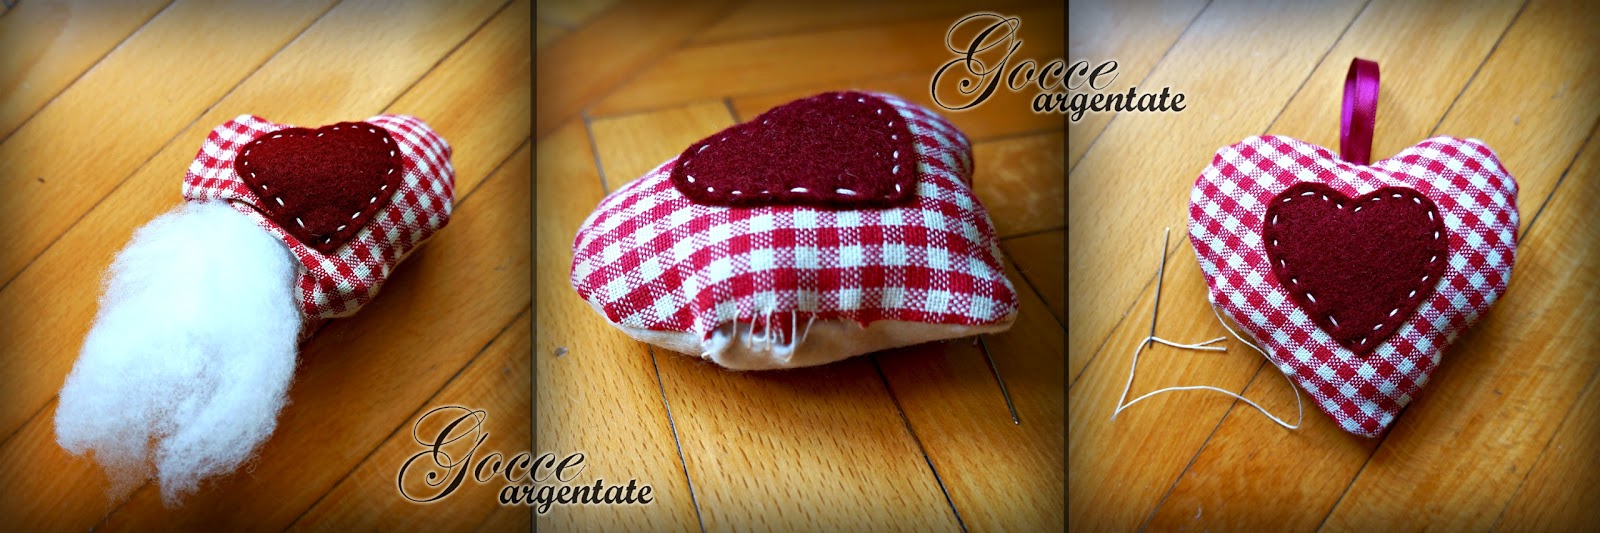
- Sew around the perimeter (you can use a sewing machine), leaving about 1cm margin and an opening on one side (you will need it to flip the heart). I like to leave open a segment which is about 1/3 of the straight line starting from the tip (picture 5).
- Remove the pins and gently turn the heart inside-out. In my opinion, the best way is to start pushing the opposite side through the opening and then slowly roll all the rest of the fabric (picture 6).

- Stuff the heart from the opening (picture 7).
- Close the opening with a thread in a matching color (picture 8).
- And here is your finished heart, ready to be hanged or further embellished :-) ! (picture 9)
Aside from varying the size and shape, or the fabric type and color, many interesting adaptations can be done:
- You can embellish the heart with flowers, ribbons, buttons… (you can find video tutorials for crocheted flowers here and a pattern for a simple one here).
- You can scent the creation, by adding lavender to the stuffing (in this case, you can keep the little puffy cushions in your home or wardrobe as air fresheners) or, for a very personalized S Valentine’s day present, you can spray you cologne on it.
- You can add embroidery on the little heart on the front, or, in the case of a present, when you are sewing, in step 2, you can leave the top open and use it as a pocket to insert a love message.
- The small hearts also be very nice Christmas ornaments
Here are some of the ones I made. I hope you enjoyed
the tutorial, and, if you have any other ideas on the use of these little
fluffy creations, please let me know!
I wish you a lovely day!

My favorite parties: Under the Table and Dreaming - Between Naps on the Porch - Dwellings - Creatively living - The dedicated house - Rain on a tin Roof - Its So Very Cheri - DIY Showoff - The Stories of A2Z - Coastal Charm - A Stroll thru Life - My Uncommon Slice of Suburbia - Stone Gable - Cozy little house - Knick of time - Savvy Southern Style - Ivy and Elaphants - Green Willow Pond - No Minimalist Here - From my front porch to yours - Craftberry Bush - The Brambleberry Cottage - French Country Cottage - Common Ground - The Charm of Home - The shabby nest - Romantic home - Sunny simple life - The cottage market
Featured on:
My favorite parties: Under the Table and Dreaming - Between Naps on the Porch - Dwellings - Creatively living - The dedicated house - Rain on a tin Roof - Its So Very Cheri - DIY Showoff - The Stories of A2Z - Coastal Charm - A Stroll thru Life - My Uncommon Slice of Suburbia - Stone Gable - Cozy little house - Knick of time - Savvy Southern Style - Ivy and Elaphants - Green Willow Pond - No Minimalist Here - From my front porch to yours - Craftberry Bush - The Brambleberry Cottage - French Country Cottage - Common Ground - The Charm of Home - The shabby nest - Romantic home - Sunny simple life - The cottage market


P.s. If you don’t want to miss any crafty project, remember to follow the blog by clicking on the “join this site” button in the right column ;-)
No comments:
Post a Comment